Saturday, March 27, 2010

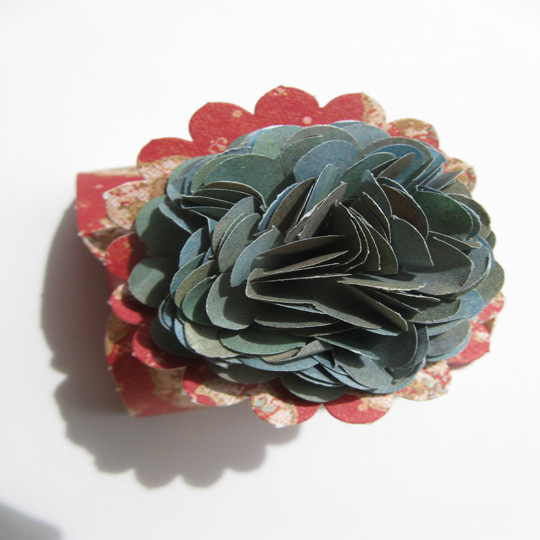
Puffy flower with K & Company box

Aloha! Wow, I was worried I wouldn't make my monthly for March! I've been busy; started off with cushions for people then curtains which need to be finished for a dear friend. I've also been busy shopping for papercraft supplies.  Following these beautiful blogs and seeing all the wonderful cards and projects that everyone has displayed on their blog just lit a fire to get me using what I have in my crowded workroom to adding something new for my projects.
So, I was at Corie's site last night and decided to make one of her puffy flowers; mahalo Corie for the tute. On my way to Munchkins in Mililani today, I made my flower (don't worry I wasn't driving, DH drove), and attached it to a K & Co box I made a couple of days ago.  I attached the flower to only one side of the top of the box since the top is the opening of the box.o
I hope to get some jewelry projects up soon.   Aloha for now.
                       

Tuesday, February 2, 2010

Burbies Tutorial

Materials:

1 cloth diaper (the one with the padding down the center)
5/8 yd of fabric
matching thread
basic sewing supplies, sewing machine, iron
  • You may want to wash your diaper and fabric to preshrink it before putting it together.
  • If you purchase a yard of fabric, you can make a gift set of burbie cloth and the pack and go bag for the disposable diaper and wipes container.
Measure the diaper to determine how big you need to cut your fabric. Cut your fabric 1" larger than the length of your diaper and 5" wider than your diaper. Whether you're making just one burbie or a dozen you'll want to measure each one separately and not assume they're all the same size, trust me they're not.


Mark and draw a line 1-1/2 inches from the edge of the diaper as shown.

These two lines will be the placement lines for the fabric.


Fold under a 1/2" at the top and bottom of your fabric piece; press with the iron.


Pin one raw edge of the fabric to one long side of the diaper, placing the raw edge of the fabric on the line that was drawn in step one. Be sure the raw edge is facing the outside edge of the diaper and that the right side of the fabric is on the diaper. Stitch fabric and diaper together using a 1/2" seam from the edge of the fabric. Do the same for the other edge of the diaper and fabric.

  • Because the diaper has a little more give (stretch), stitching with the fabric on the top and the diaper on the bottom will help to stabilize your stitching and prevent the diaper from stretching and distorting your project.
After stitching, turn project right side out. You should have a 2" border of fabric on the sides of your diaper. Press, not iron your piece.

Align your top edges (remember, they're still open) and stitch close to the edge. Do the same to the bottom.

Your burbie is now ready to use.



Wednesday, January 27, 2010

Aloha and Happy New year! Hard to believe this first month is almost over. I did manage to get some pack and go bags, and feeding capes completed. Getting the package headers took some time, but they look fine for now.
I also played with some cardstock purses and decided to share them with some friends at a tea party. K&Company has books of beautiful double-sided precut purses, flowers and tags. All you do is punch them out, fold on the score lines to form your little box or purse and hold them together with double stick tape or glue. Embellishing them is the fun part. Pre-sticky rhinestones, pearls, ribbons, strings of pearls, tiny colorful brads and eyelets are just a few of the decorative embellishments. Fill them with goodies, I put teabags in mine for the tea party, but treats like candies will do also. These make such unexpected favors for such socials.


Pack and Go for diapers and wipes


K&Company cutout purses

Monday, November 30, 2009

Busy November

Well it's been a very busy November following the birth of my seventh grandchild. I try to remember to give my daughter and her family their privacy, but it's quite difficult when her babies are so beautiful!
I've gathered some photos and will try once again to post some craft and sewing ideas. Once I get those up and running, I'll let everyone know the address. I do plan to ask my nieces for their help, one has a degree in computer communications. Love them dearly and they're always so busy. They're back at school for more college degrees and they work if not one but two jobs. Hard working girls! So when I get them over here is anybody's guest.
For now, all I can do is blog once a month. Aloha

Wednesday, October 28, 2009

Not working for me

This Blogger is just not working for me. I've been trying to post a tutorial that was created in Microsoft Office Word, pictures included, but was not allowed.
It appears the text is allowed without the pictures.
In order for the tutorial to be clear for the reader, the photos next to each step is necessary.
I did check with the forums on this blog site to see if others had the same problem. As far as I could see, the problems were similar and solved, because there were no pictures involved.
I guess I'll have to try blogging somewhere else where I can post tutorials with multiple photos.
For now, enjoy and be grateful for all you have---Creative Grammie